All about product
 Reviews
 INSTRUCTION FOR USE

Product Description
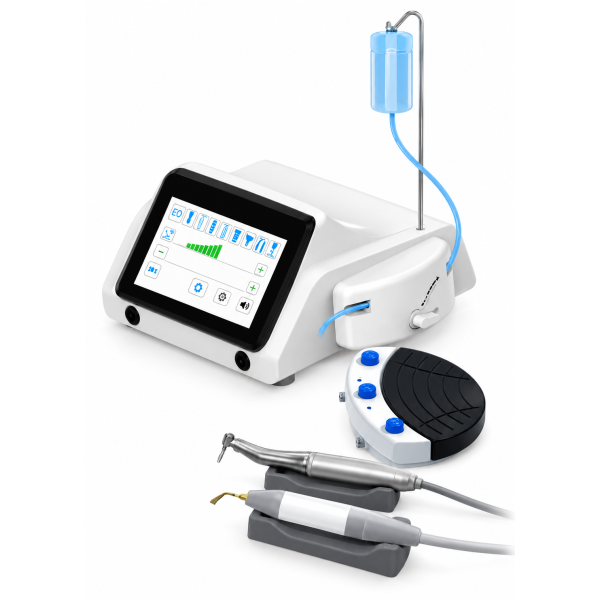
Bone Surgery and Implantation Machine All-in-One
The Bone Surgery and Implantation Machine All-in-One combines a dental implant motor, piezoelectric bone surgery, ultrasonic scaling, and root canal activation in one multifunctional unit. Designed for professional dental use, it brings several treatment functions together in a single system.
Multiple function interfaces allow clinicians to select the appropriate operating mode for the procedure. The Bluetooth foot pedal provides wireless foot control, while the 20:1 contra-angle handpiece with integrated light helps illuminate the treatment area during implant procedures.
Key Features
- Four integrated functions: Implant surgery, bone surgery, scaling, and root canal activation.
- Piezoelectric bone cutting: Uses a dedicated piezosurgery handpiece and tips for ultrasonic bone-cutting procedures.
- Bluetooth foot pedal: Provides wireless control during operation.
- Multiple function interfaces: Provides access to the system’s different treatment modes.
- Illuminated 20:1 contra-angle: Combines reduction gearing with integrated lighting for implant procedures.
- Included surgical and scaling accessories: Supplied with six piezosurgery tips, two scaler tips, and supporting accessories.
Applications
For dental implant procedures, piezoelectric bone surgery, ultrasonic scaling, and root canal activation using the appropriate compatible handpiece, tip, and operating mode.
Package Contents
1 × Main control unit
1 × Bluetooth foot pedal
1 × Piezosurgery handpiece
1 × 20:1 contra-angle handpiece with light
6 × Piezosurgery tips
1 × Piezosurgery wrench
2 × Scaler tips
2 × Silicone bases
2 × Silicone irrigation tubes
1 × Power cord
Professional Use
For use by qualified dental professionals. Follow the equipment manufacturer’s instructions for operation, accessory selection, cleaning, disinfection, and sterilization of applicable components.

Reviews
There are no reviews for this product, be the first to leave your review.


Bone Surgery and Implantation Machine All in One
For professional dental use only. Read the complete operating manual and the instructions supplied with each handpiece, tip, and accessory before use.
1. Preparation Before Use
- Review the patient’s medical history and the contraindications and precautions listed in the manufacturer’s manual.
- Inspect the main unit, power cord, motor, handpieces, irrigation tubing, and foot pedal. Do not use damaged or malfunctioning equipment.
- Clean and sterilize reusable patient-contact components according to their individual instructions before first use and between patients.
- Place the main unit on a stable, dry surface. Confirm that the electrical supply matches the device’s rating.
- Use only manufacturer-approved compatible accessories.
2. Equipment Setup
- With the device switched off, connect the motor or piezosurgery handpiece to the appropriate socket.
- For implant procedures, securely attach the compatible 20:1 contra-angle handpiece.
- For ultrasonic procedures, install the appropriate tip using the supplied torque-limiting wrench. Do not use worn, bent, or damaged tips.
- Install the irrigation tubing according to the manual, ensuring that it is not kinked and that the pump cover is closed.
- Connect the appropriate irrigation solution and confirm that the wireless foot pedal is connected and functioning.
- Switch on the unit and allow the startup self-test to complete.
3. Selecting the Operating Function
Select the function appropriate to the procedure and installed accessory:
- Implant mode: Select the required surgical program and verify the handpiece ratio, speed, torque, rotation direction, and irrigation settings.
- BONE mode: Select the compatible piezosurgery tip and the prescribed power and irrigation settings.
- PERIO mode: Use the compatible scaling or periodontal tip with the recommended settings.
- ENDO mode: Use the compatible endodontic accessory and the settings specified for that accessory.
Use the implant system’s surgical protocol and the accessory manufacturer’s instructions to determine operating parameters. Do not assume that preset values are suitable for every procedure.
4. During Operation
- Verify secure accessory attachment, irrigation flow, and normal operation before patient contact.
- Activate the instrument using the foot pedal.
- Maintain irrigation as required for the selected procedure and accessory.
- Stop the instrument completely before changing handpieces, drills, or tips.
- Stop immediately if an alarm, irrigation interruption, unusual vibration, excessive heat, or other malfunction occurs. Follow the manual’s troubleshooting instructions before resuming use.
5. After Use and Reprocessing
- Stop operation and follow the manual’s flushing and cleaning procedure for the irrigation system.
- Switch off and disconnect the power before disassembly or external cleaning.
- Discard components labeled for single use. Do not reprocess them.
- Clean, inspect, package, and sterilize reusable components according to their validated, component-specific instructions.
- Remove the ultrasonic tip before processing the handpiece. Do not separate the ultrasonic handpiece from its attached cable.
- Do not autoclave the main unit or spray liquids directly onto its housing.
- Allow sterilized components to cool and ensure electrical connectors are completely dry before reconnection.
6. Important Precautions
- Review all contraindications before treatment. The supplied manual prohibits ultrasonic use for patients or operators with pacemakers.
- Do not apply ultrasonic tips to metal or ceramic prostheses.
- Do not operate in an explosive or oxygen-rich environment.
- Do not bend, file, or otherwise modify working tips.
- Refer repairs and persistent faults to an authorized service provider.
Storage
Store the equipment in a clean, dry location protected from moisture, direct sunlight, and impact. Keep sterilized accessories in intact protective packaging